After participating in our first comic con back in November I decided that we needed to create something special for signage in our booth. I have always had an aversion to using digitally printed signs. It isn’t that I don’t approve of them. It is just that Fez-o-rama is such a hand-made company that I felt it needed a hand-made sign. I even attempted to digitally create the look of a hand-made sign but that seemed like a cop out.
I have a love for vintage signs but knew that whatever we created needed to be extremely lightweight and relatively easy to transport. Also it needed some sort of creative element to warrant all of the hands-on time I was going to be spending on it.
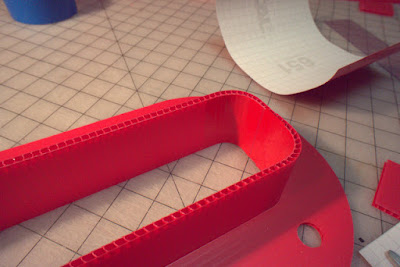
I settled on the idea of creating lighted box letters when I started seeing the new LED Christmas lights arriving in the stores - as they tend to do by mid-September. Ironically, since I didn't get started on this project until December we nearly didn't get any lights as the stores were already sold out of my first choice and the pickings were slim. The other part of the equation was deciding on the material for the sign. I needed something that could get banged up a bit and not weigh too much. I went with corrugated plastic since I figured it would stand up to some abuse and I could exploit the corrugation channels to form the necessary curves of the letters.
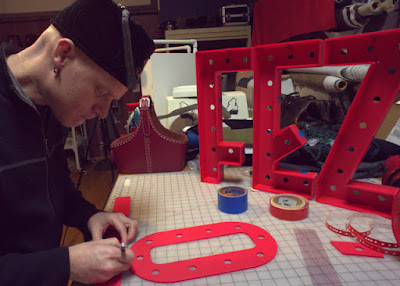
The lettering was worked out in CorelDraw and based on the freehand layout I painted a while back on our bamboo façade for the counter top. These letters were then laser cut from the sheet plastic while all of the sidewalls were hand cut and assembled as I went along. This made the placement of the lights much easier and while I could have worked out laser cuts for the sidewalls I really had no idea what I was doing or how I was going to assemble these letters.
Actually I have a great deal of experience not knowing what the hell I am doing while making things so I was actually well within my comfort zone on this. The letters themselves went together rather smoothly but I did learn a number of tricks by the time I reached the eighth letter.
On the sidewalls I made seams using adhesive vinyl sheets commonly used for sign lettering. I already had a supply of this and the color was a surprisingly close match to the plastic. It turns out that polypropylene doesn't play very nice with most glues but a hot glue gun does a rather impressive job of getting things to stick. I ran a bead along all of the inside corners and along the backs of the letters to hold them together. I sprayed the letters with a bit of paint to create some texture and give them a bit of “weather”. This also helped to obscure the seams and glue.
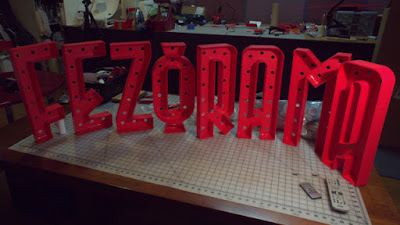
The letters were then glued to a back board of black corrugated plastic that was split down the center for transport. The overall length is 6 feet when assembled but I didn't want to have to struggle with fitting this into a car. The back board is supported by a PVC frame that includes a number of T joints that can be used for mounting options as well as hidden eye bolts with quick links for hanging. These PVC joints also work as mounts for our transit brackets to make the entire thing travel as a compact unit.
The lights are mounted to the letters by passing through the back and the lenses are snapped on from the front. There are 101 lights in the finished sign. This is either because we will not have our designs dictated by the number of lights that came on the strand or because we apparently can’t count to 100. I am going to go with the former since the latter ends with lots of swearing and tears.
So we spliced in the missing lamp, added connectors to separate the wires for when the sign is in transit and grabbed an extension cord to plug the thing in. Luckily it lit up like a charm on the first test. All I needed to do was tie down the wiring on the back so it wouldn't get caught on anything as we moved it around.
The sign made it’s public debut at the Arizona Amazing Comic Con this past weekend and worked beautifully. It was easy to move, easy to hang, ran all weekend on our battery pack and got lots of compliments.
Here is a short slide show of the whole build process including the final result.
Now that Phase 1 is a success, we can move on to Phase 2: controlling the lights with an Android phone!